Managing Players
An important aspect of any local multiplayer game is handling players joining, leaving, and transitioning between scenes.
Adding Players
Once Local Multiplayer has been initialized, you can begin adding Local Players using the method selected during initialization.
Adding Players Manually
Only use the Add Player Instruction if you have specific needs or requirements. In most scenarios, the other join behaviors will be easier to work with.
Spawn Location
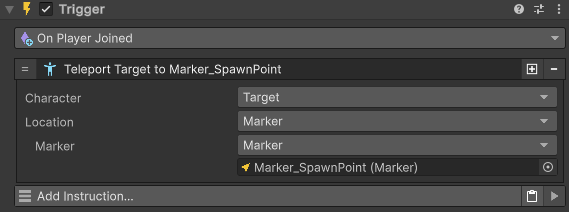
To change where a Local Player spawns, you can use Teleport Character with an On Player Joined trigger.
Dynamic Spawning Locations
Check out the Examples for more advanced spawn location behaviors.
Removing Players
Use the Remove Player instruction to remove a Local Player from the session.
Resource Cleanup
Always use the Remove Local Player instruction to properly clean up player resources. Don't destroy player objects directly.
Transitioning Between Scenes
While there are several ways to manage players across scenes, below is a common workflow that can act as a starting point for your project:
- Initialize Once: Instead of having the Initialize Local Multiplayer instruction in every scene of your project, initialize only once with the Persist Between Scenes option selected.
- Set Local Player to Persist: Enable the Survive Scene Load setting on your Local Player prefab.
- Handle Scene Specifics: For each subsequent scene in your project, you can handle things like changing player visibility, moving to spawn locations, changing character models, and so on.
Tip
Using this method helps avoid the headache of reassigning player numbers and devices between scenes.